本文介绍JanusGraph的分布式id生成逻辑;
大家好,我是洋仔,JanusGraph图解系列文章,实时更新~
图数据库文章总目录: **源码分析相关可查看github(求star~~)**: https://github.com/YYDreamer/janusgraph
下述流程高清大图地址:https://www.processon.com/view/link/5f471b2e7d9c086b9903b629
版本:JanusGraph-0.5.2
转载文章请保留以下声明:
作者:洋仔聊编程https://liyangyang.blog.csdn.net/
正文 在介绍JanusGraph的分布式ID生成策略之前,我们来简单分析一下分布式ID应该满足哪些特征?
全局唯一 :必须保证ID是分布式环境中全局性唯一的,这是基本要求高性能 :高可用低延时,ID生成响应快;否则可能会成为业务瓶颈高可用 :提供分布式id的生成的服务要保证高可用,不能随随便便就挂掉了,会对业务产生影响趋势递增 :主要看业务场景,类似于图存储中节点的唯一id就尽量保持趋势递增;但是如果类似于电商订单就尽量不要趋势递增,因为趋势递增会被恶意估算出当天的订单量和成交量,泄漏公司信息接入方便 :如果是中间件,要秉着拿来即用的设计原则,在系统设计和实现上要尽可能的简单一:常用分布式id生成策略 当前常用的分布式id的生成策略主要分为以下四种:
UUID 数据库+号段模式(优化:数据库+号段+双buffer) 基于Redis实现 雪花算法(SnowFlake) 还有一些其他的比如:基于数据库自增id、数据库多主模式等,这些在小并发的情况下可以使用,大并发的情况下就不太ok了
市面上有一些生成分布式id的开源组件,包括滴滴基于数据库+号段实现的TinyID 、百度基于SnowFlake的Uidgenerator、美团支持号段和SnowFlake的Leaf等
那么,在JanusGraph中分布式id的生成是采用的什么方式呢?
二:JanusGraph的分布式id策略 在JanusGraph中,分布式id的生成采用的是数据库+号段+双buffer优化的模式; 下面我们来具体分析一下:
分布式id生成使用的数据库就是JanusGraph当前使用的第三方存储后端,这里我们以使用的存储后端Hbase为例;
JanusGraph分布式id生成所需元数据存储位置:
在Hbase中有column family 列族的概念; JanusGraph在初始化Hbase表时默认创建了9大列族,用于存储不同的数据, 具体看《图解图库JanusGraph系列-一文知晓图数据底层存储结构》;
其中有一个列族janusgraph_ids简写为i这个列族,主要存储的就是JanusGraph分布式id生成所需要的元数据!
JanusGraph的分布式id的组成结构:
主要分为4部分:0、count、partition、ID padding(每个类型是固定值);
其实这4部分的顺序在序列化为二进制数据时,顺序会有所改变;这里只是标明了id的组成部分!
上述部分的partition + count来保证分布式节点的唯一性;
partition id:分区id值,JanusGraph默认分了32个逻辑分区;节点分到哪个分区采用的是随机分配; count:每个partition都有对应的一个count范围:0-2的55次幂;JanusGraph每次拉取一部分的范围作为节点的count取值;JanusGraph保证了针对相同的partition,不会重复获取同一个count值! 保证count在partition维度保持全局唯一性,就保证了生成的最终id的全局唯一性!!
则分布式id的唯一性保证,就在于count基于partition维度的唯一性!下面我们的分析也是着重在count的获取!
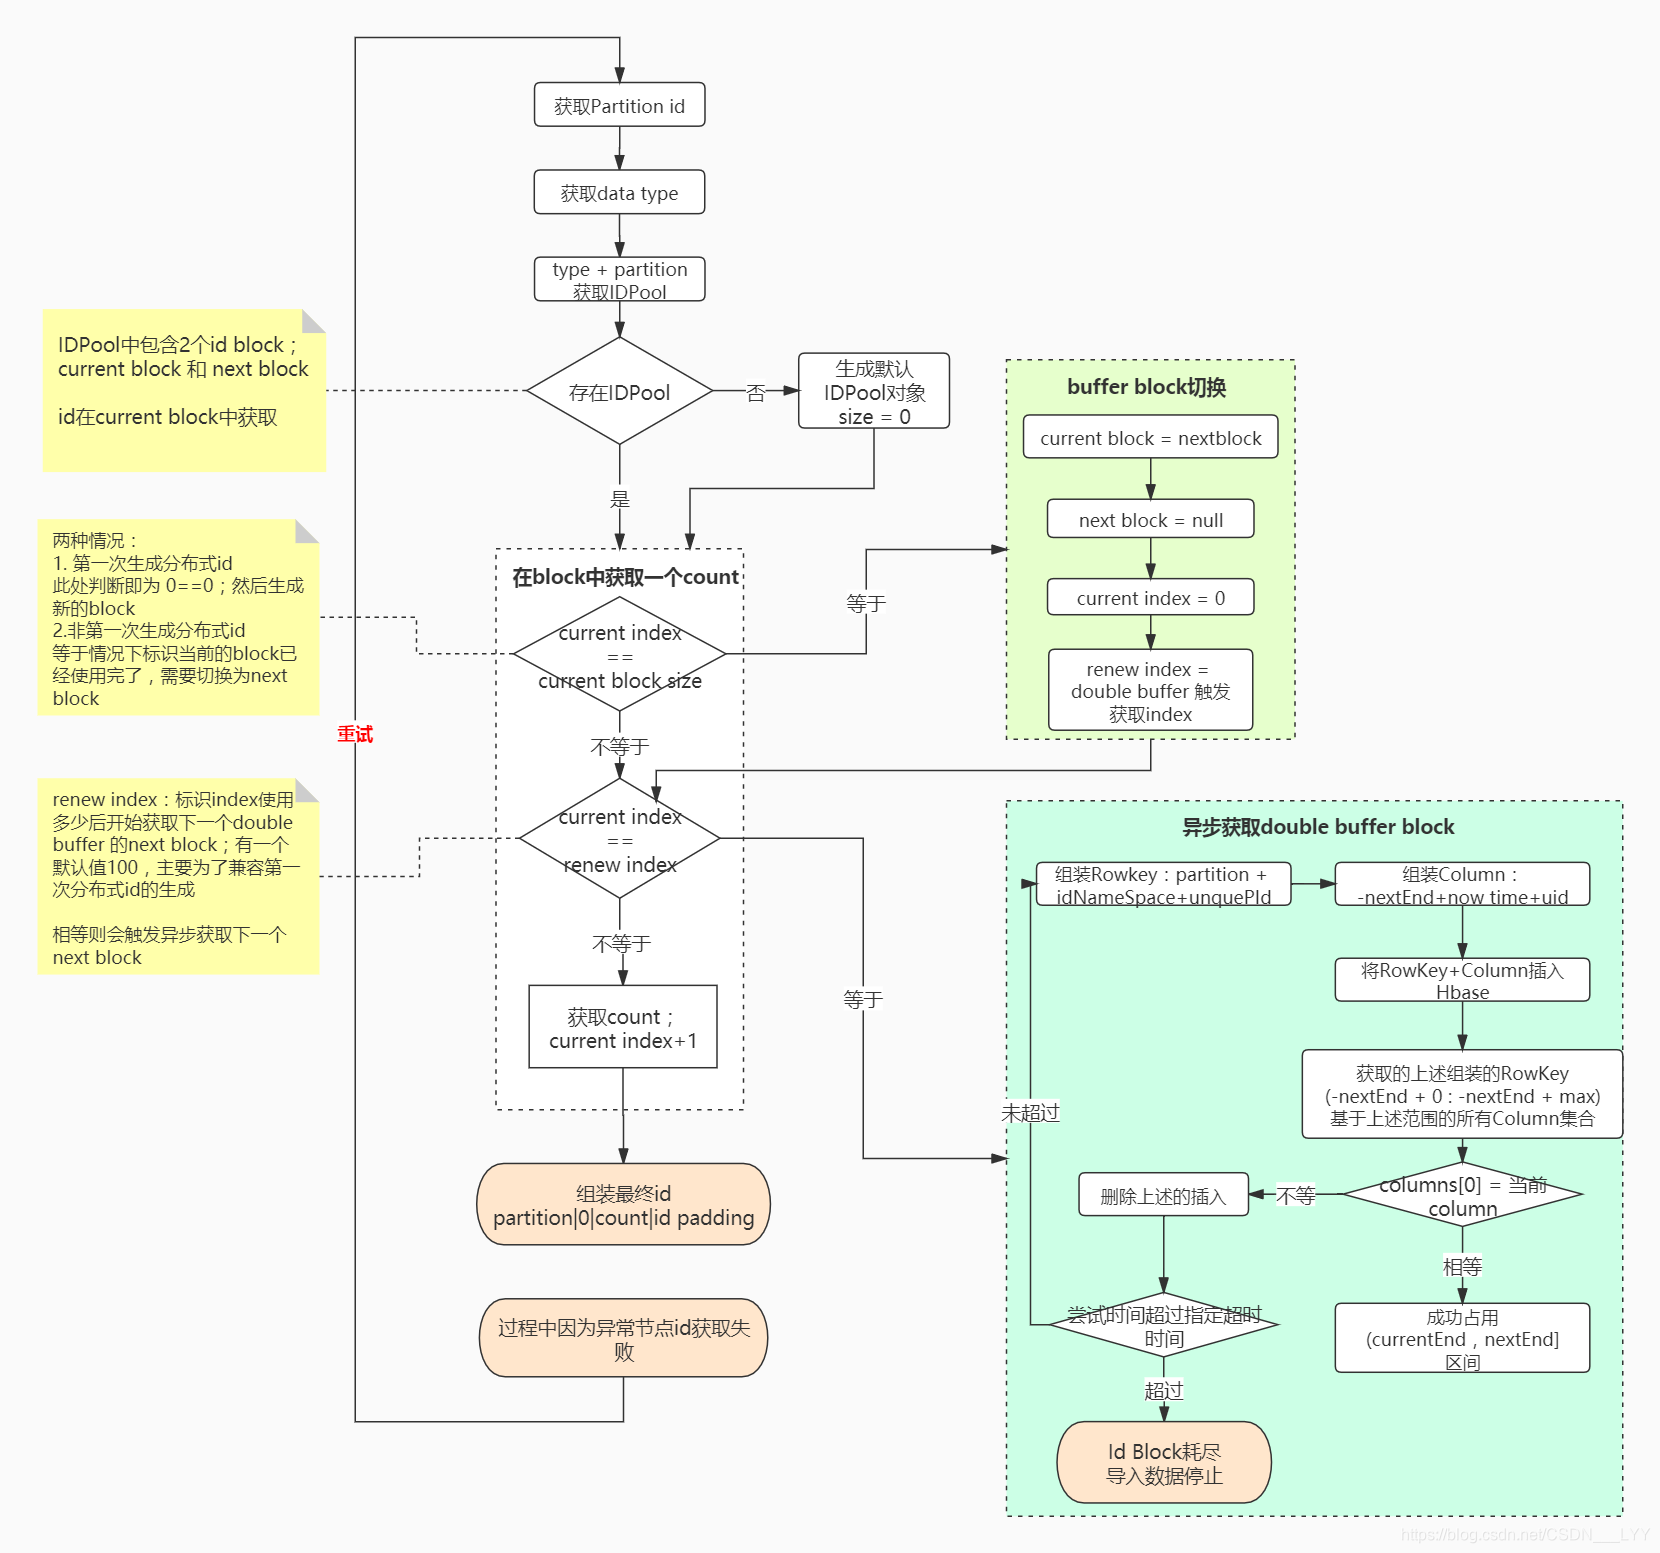
JanusGraph分布式id生成的主要逻辑流程如下图所示:(推荐结合源码分析观看!)
分析过程中有一个概念为id block:指当前获取的号段范围
JanusGraph主要使用``PartitionIDPool 类来存储不同类型的StandardIDPool; 在StandardIDPool`中主要包含两个id Block:
current block:当前生成id使用的block next block:double buffer中的另一个已经准备好的block 为什么要有两个block呢?
主要是如果只有一个block的话,当我们在使用完当前的block时,需要阻塞等待区获取下一个block,这样便会导致分布式id生成较长时间的阻塞等待block的获取;
怎么优化上述问题呢? double buffer;
除了当前使用的block,我们再存储一个next block;当正在使用的block假设已经使用了50%,触发next block的异步获取,如上图的蓝色部分所示;
这样当current block使用完成后可以直接无延迟的切换到next block如上图中绿色部分所示;
在执行过程中可能会因为一些异常导致节点id获取失败,则会进行重试;重试次数默认为1000次;
1 2 3 4 private static final int MAX_PARTITION_RENEW_ATTEMPTS = 1000 ;for (int attempt = 0 ; attempt < MAX_PARTITION_RENEW_ATTEMPTS; attempt++) { }
ps:上述所说的IDPool和block是基于当前图实例维度共用的!
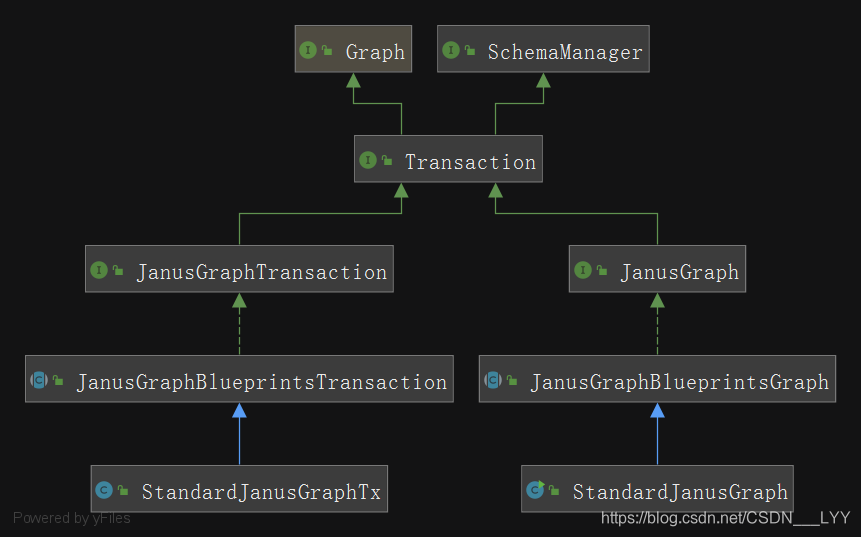
三:源码分析 在JanusGraph的源码中,主要包含两大部分和其他的一些组件:
Graph相关类:用于对节点、属性、边的操作 Transaction相关类:用于在对数据或者Schema进行CURD时,进行事务处理 其他一些:分布式节点id生成类;序列化类;第三方索引操作类等等 Graph和Transaction相关类的类图如下所示:
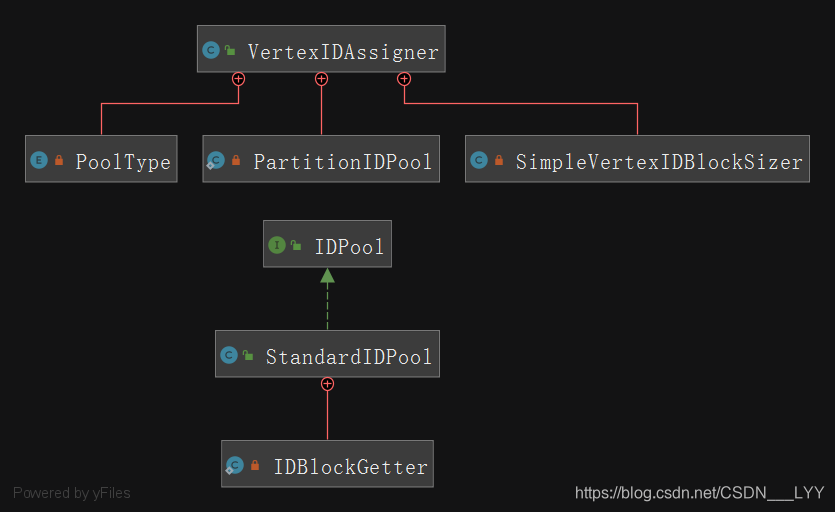
分布式id涉及到id生成的类图如下所示:
初始数据:
1 2 3 4 5 6 7 8 9 10 11 12 13 14 15 16 @Test public void addVertexTest () List<Object> godProperties = new ArrayList<>(); godProperties.add(T.label); godProperties.add("god" ); godProperties.add("name" ); godProperties.add("lyy" ); godProperties.add("age" ); godProperties.add(18 ); JanusGraphVertex godVertex = graph.addVertex(godProperties.toArray()); assertNotNull(godVertex); }
在诸神之图中添加一个name为lyy节点;看下执行流程,注意,此处主要分析的节点的分布式id生成代码!
1、调用JanusGraphBlueprintsGraph类的AddVertex方法
1 2 3 4 5 @Override public JanusGraphVertex addVertex (Object... keyValues) return getAutoStartTx().addVertex(keyValues); }
2、调用JanusGraphBlueprintsTransaction的addVertex方法
1 2 3 4 5 6 7 public JanusGraphVertex addVertex (Object... keyValues) final JanusGraphVertex vertex = addVertex(id, label); return vertex; }
3、调用StandardJanusGraphTx的addVertex方法
1 2 3 4 5 6 7 8 9 10 11 @Override public JanusGraphVertex addVertex (Long vertexId, VertexLabel label) if (vertexId != null ) { vertex.setId(vertexId); } else if (config.hasAssignIDsImmediately() || label.isPartitioned()) { graph.assignID(vertex,label); } return vertex; }
4、调用VertexIDAssigner的assignID(InternalElement element, IDManager.VertexIDType vertexIDType)方法
1 2 3 4 5 6 7 8 9 10 11 12 13 14 15 16 17 18 19 20 21 private void assignID (InternalElement element, IDManager.VertexIDType vertexIDType) for (int attempt = 0 ; attempt < MAX_PARTITION_RENEW_ATTEMPTS; attempt++) { long partitionID = -1 ; if (element instanceof JanusGraphSchemaVertex) { } try { assignID(element, partitionID, vertexIDType); } catch (IDPoolExhaustedException e) { continue ; } assert element.hasId(); } }
5、调用了VertexIDAssigner的assignID(final InternalElement element, final long partitionIDl, final IDManager.VertexIDType userVertexIDType)方法
1 2 3 4 5 6 7 8 9 10 11 12 13 14 15 16 17 18 19 20 21 22 23 24 25 26 27 28 29 30 31 32 33 34 35 36 37 38 39 40 41 42 43 44 45 46 47 48 49 50 51 52 53 54 55 56 57 58 59 60 61 62 63 64 65 66 67 68 69 70 71 72 73 74 75 private void assignID (final InternalElement element, final long partitionIDl, final IDManager.VertexIDType userVertexIDType) final int partitionID = (int ) partitionIDl; long count; if (element instanceof JanusGraphSchemaVertex) { Preconditions.checkArgument(partitionID==IDManager.SCHEMA_PARTITION); count = schemaIdPool.nextID(); } else if (userVertexIDType==IDManager.VertexIDType.PartitionedVertex) { count = partitionVertexIdPool.nextID(); } else { PartitionIDPool partitionPool = idPools.get(partitionID); if (partitionPool == null ) { partitionPool = new PartitionIDPool(partitionID, idAuthority, idManager, renewTimeoutMS, renewBufferPercentage); idPools.putIfAbsent(partitionID,partitionPool); partitionPool = idPools.get(partitionID); } Preconditions.checkNotNull(partitionPool); if (partitionPool.isExhausted()) { placementStrategy.exhaustedPartition(partitionID); throw new IDPoolExhaustedException("Exhausted id pool for partition: " + partitionID); } IDPool idPool; if (element instanceof JanusGraphRelation) { idPool = partitionPool.getPool(PoolType.RELATION); } else { Preconditions.checkArgument(userVertexIDType!=null ); idPool = partitionPool.getPool(PoolType.getPoolTypeFor(userVertexIDType)); } try { count = idPool.nextID(); partitionPool.accessed(); } catch (IDPoolExhaustedException e) { log.debug("Pool exhausted for partition id {}" , partitionID); placementStrategy.exhaustedPartition(partitionID); partitionPool.exhaustedIdPool(); throw e; } } long elementId; if (element instanceof InternalRelation) { elementId = idManager.getRelationID(count, partitionID); } else if (element instanceof PropertyKey) { elementId = IDManager.getSchemaId(IDManager.VertexIDType.UserPropertyKey,count); } else if (element instanceof EdgeLabel) { elementId = IDManager.getSchemaId(IDManager.VertexIDType.UserEdgeLabel, count); } else if (element instanceof VertexLabel) { elementId = IDManager.getSchemaId(IDManager.VertexIDType.VertexLabel, count); } else if (element instanceof JanusGraphSchemaVertex) { elementId = IDManager.getSchemaId(IDManager.VertexIDType.GenericSchemaType,count); } else { elementId = idManager.getVertexID(count, partitionID, userVertexIDType); } Preconditions.checkArgument(elementId >= 0 ); element.setId(elementId); }
上述代码,我们拿到了对应的IdPool,有两种情况:
第一次获取分布式id时,分区对应的IDPool初始化为默认的size = 0的IDPool 分区对应的IDPool不是初次获取 这两种情况的处理,都在代码count = idPool.nextID()的StandardIDPool类中的nextID()方法中被处理!
在分析该代码之前,我们需要知道 PartitionIDPool和StandardIDPool的关系:
每个partition都有一个对应的PartitionIDPool extends EnumMap<PoolType,IDPool> 是一个枚举map类型;
每一个PartitionIDPool都有对应的不同类型的StandardIDPool:
NORMAL_VERTEX:用于vertex id的分配 UNMODIFIABLE_VERTEX:用于schema label id的分配 RELATION:用于edge id的分配 在StandardIDPool中包含多个字段,分别代表不同的含义,抽取几个重要的字段进行介绍:
1 2 3 4 5 6 7 8 9 10 11 12 13 14 15 16 private static final int RENEW_ID_COUNT = 100 ; private final long idUpperBound; private final int partition; private final int idNamespace; private final Duration renewTimeout;private final double renewBufferPercentage;private IDBlock currentBlock; private long currentIndex; private long renewBlockIndex; private volatile IDBlock nextBlock;private final ThreadPoolExecutor exec;
6、调用了StandardIDPool类中的nextID方法
经过上述分析,我们知道,分布式唯一id的唯一性是由在partition维度下的count的值的唯一性来保证的;
上述代码通过调用IDPool的nextId来获取count值;
下述代码就是获取count的逻辑;
1 2 3 4 5 6 7 8 9 10 11 12 13 14 15 16 17 18 19 20 21 22 23 24 25 26 27 28 29 30 31 32 33 @Override public synchronized long nextID () assert currentIndex <= currentBlock.numIds(); if (currentIndex == currentBlock.numIds()) { try { nextBlock(); } catch (InterruptedException e) { throw new JanusGraphException("Could not renew id block due to interruption" , e); } } if (currentIndex == renewBlockIndex) { startIDBlockGetter(); } long returnId = currentBlock.getId(currentIndex); currentIndex++; if (returnId >= idUpperBound) throw new IDPoolExhaustedException("Reached id upper bound of " + idUpperBound); log.trace("partition({})-namespace({}) Returned id: {}" , partition, idNamespace, returnId); return returnId; }
上述代码中进行了两次判断:
currentIndex == currentBlock.numIds():第一次生成分布式id:此处判断即为 0==0;然后生成新的block 非第一次生成分布式id:等于情况下标识当前的block已经使用完了,需要切换为next block currentIndex == renewBlockIndexrenew index:标识index使用多少后开始获取下一个double buffer 的next block;有一个默认值100,主要为了兼容第一次分布式id的生成;相等则会触发异步获取下一个next block 下面我们分别对nextBlock();逻辑和startIDBlockGetter();进行分析;
7、调用了StandardIDPool类中的nextBlock方法
1 2 3 4 5 6 7 8 9 10 11 12 13 14 15 16 17 18 19 20 21 22 23 24 25 private synchronized void nextBlock () throws InterruptedException if (null == nextBlock && null == idBlockFuture) { startIDBlockGetter(); } if (null == nextBlock) { waitForIDBlockGetter(); } currentBlock = nextBlock; currentIndex = 0 ; nextBlock = null ; renewBlockIndex = Math.max(0 ,currentBlock.numIds()-Math.max(RENEW_ID_COUNT, Math.round(currentBlock.numIds()*renewBufferPercentage))); }
主要是做了三件事:
1、block是否为空,为空的话则异步获取一个block 2、nextBlock不为空的情况下:next赋值到current、next置空、index置零 3、计算获取下一个nextBlock的触发index renewBlockIndex值 8、调用了StandardIDPool类中的startIDBlockGetter方法
1 2 3 4 5 6 7 8 9 10 private synchronized void startIDBlockGetter () Preconditions.checkArgument(idBlockFuture == null , idBlockFuture); if (closed) return ; log.debug("Starting id block renewal thread upon {}" , currentIndex); idBlockGetter = new IDBlockGetter(idAuthority, partition, idNamespace, renewTimeout); idBlockFuture = exec.submit(idBlockGetter); }
其中创建一个线程任务,提交到线程池exec进行异步执行;
下面看下,线程类的call方法主要是调用了idAuthority.getIDBlock方法,这个方法主要是基于Hbase来获取还未使用的block;
1 2 3 4 5 6 7 8 9 10 11 12 13 14 15 16 private static class IDBlockGetter implements Callable <IDBlock > @Override public IDBlock call () Stopwatch running = Stopwatch.createStarted(); try { IDBlock idBlock = idAuthority.getIDBlock(partition, idNamespace, renewTimeout); return idBlock; } catch (BackendException e) {} } }
9、调用ConsistentKeyIDAuthority类的getIDBlock方法
1 2 3 4 5 6 7 8 9 10 11 12 13 14 15 16 17 18 19 20 21 22 23 24 25 26 27 28 29 30 31 32 33 34 35 36 37 38 39 40 41 42 43 44 45 46 47 48 49 50 51 52 53 54 55 56 57 58 59 60 61 62 63 64 65 66 67 68 69 70 71 72 73 74 75 76 77 78 79 80 81 82 83 84 85 86 87 88 89 90 91 92 93 94 95 @Override public synchronized IDBlock getIDBlock (final int partition, final int idNamespace, Duration timeout) throws BackendException final Timer methodTime = times.getTimer().start(); final long blockSize = getBlockSize(idNamespace); final long idUpperBound = getIdUpperBound(idNamespace); final int maxAvailableBits = (VariableLong.unsignedBitLength(idUpperBound)-1 )-uniqueIdBitWidth; final long idBlockUpperBound = (1L <<maxAvailableBits); final List<Integer> exhaustedUniquePIDs = new ArrayList<>(randomUniqueIDLimit); Duration backoffMS = idApplicationWaitMS; while (methodTime.elapsed().compareTo(timeout) < 0 ) { final int uniquePID = getUniquePartitionID(); final StaticBuffer partitionKey = getPartitionKey(partition,idNamespace,uniquePID); try { long nextStart = getCurrentID(partitionKey); if (idBlockUpperBound - blockSize <= nextStart) { } long nextEnd = nextStart + blockSize; StaticBuffer target = null ; boolean success = false ; try { Timer writeTimer = times.getTimer().start(); target = getBlockApplication(nextEnd, writeTimer.getStartTime()); final StaticBuffer finalTarget = target; BackendOperation.execute(txh -> { idStore.mutate(partitionKey, Collections.singletonList(StaticArrayEntry.of(finalTarget)), KeyColumnValueStore.NO_DELETIONS, txh); return true ; },this ,times); writeTimer.stop(); final boolean distributed = manager.getFeatures().isDistributed(); Duration writeElapsed = writeTimer.elapsed(); if (idApplicationWaitMS.compareTo(writeElapsed) < 0 && distributed) { throw new TemporaryBackendException("Wrote claim for id block [" + nextStart + ", " + nextEnd + ") in " + (writeElapsed) + " => too slow, threshold is: " + idApplicationWaitMS); } else { assert 0 != target.length(); final StaticBuffer[] slice = getBlockSlice(nextEnd); final List<Entry> blocks = BackendOperation.execute( (BackendOperation.Transactional<List<Entry>>) txh -> idStore.getSlice(new KeySliceQuery(partitionKey, slice[0 ], slice[1 ]), txh),this ,times); if (blocks == null ) throw new TemporaryBackendException("Could not read from storage" ); if (blocks.isEmpty()) throw new PermanentBackendException("It seems there is a race-condition in the block application. " + "If you have multiple JanusGraph instances running on one physical machine, ensure that they have unique machine idAuthorities" ); if (target.equals(blocks.get(0 ).getColumnAs(StaticBuffer.STATIC_FACTORY))) { ConsistentKeyIDBlock idBlock = new ConsistentKeyIDBlock(nextStart,blockSize,uniqueIdBitWidth,uniquePID); if (log.isDebugEnabled()) { idBlock, partition, idNamespace, uid); } success = true ; return idBlock; } else { } } } finally { if (!success && null != target) { for (int attempt = 0 ; attempt < ROLLBACK_ATTEMPTS; attempt++) { } } } } catch (UniqueIDExhaustedException e) { log.warn(e.getMessage()); } catch (TemporaryBackendException e) { backoffMS = Durations.min(backoffMS.multipliedBy(2 ), idApplicationWaitMS.multipliedBy(32 )); sleepAndConvertInterrupts(backoffMS); \ } } throw new TemporaryLockingException(); }
主要的逻辑就是:
组装Rowkey:partition + idNameSpace+unquePId组装Column:-nextEnd+now time+uid将RowKey+Column插入Hbase 获取的上述组装的RowKey 基于(-nextEnd + 0 : -nextEnd + max)范围的所有Column集合 判断集合的第一个Column是不是当前插入的Column,是的话则占用block成功,不是的话则占用失败,删除刚才占用并进行重试 最终:异步获取到了唯一占用的Block,然后生成对应的唯一count,组装最后的唯一id
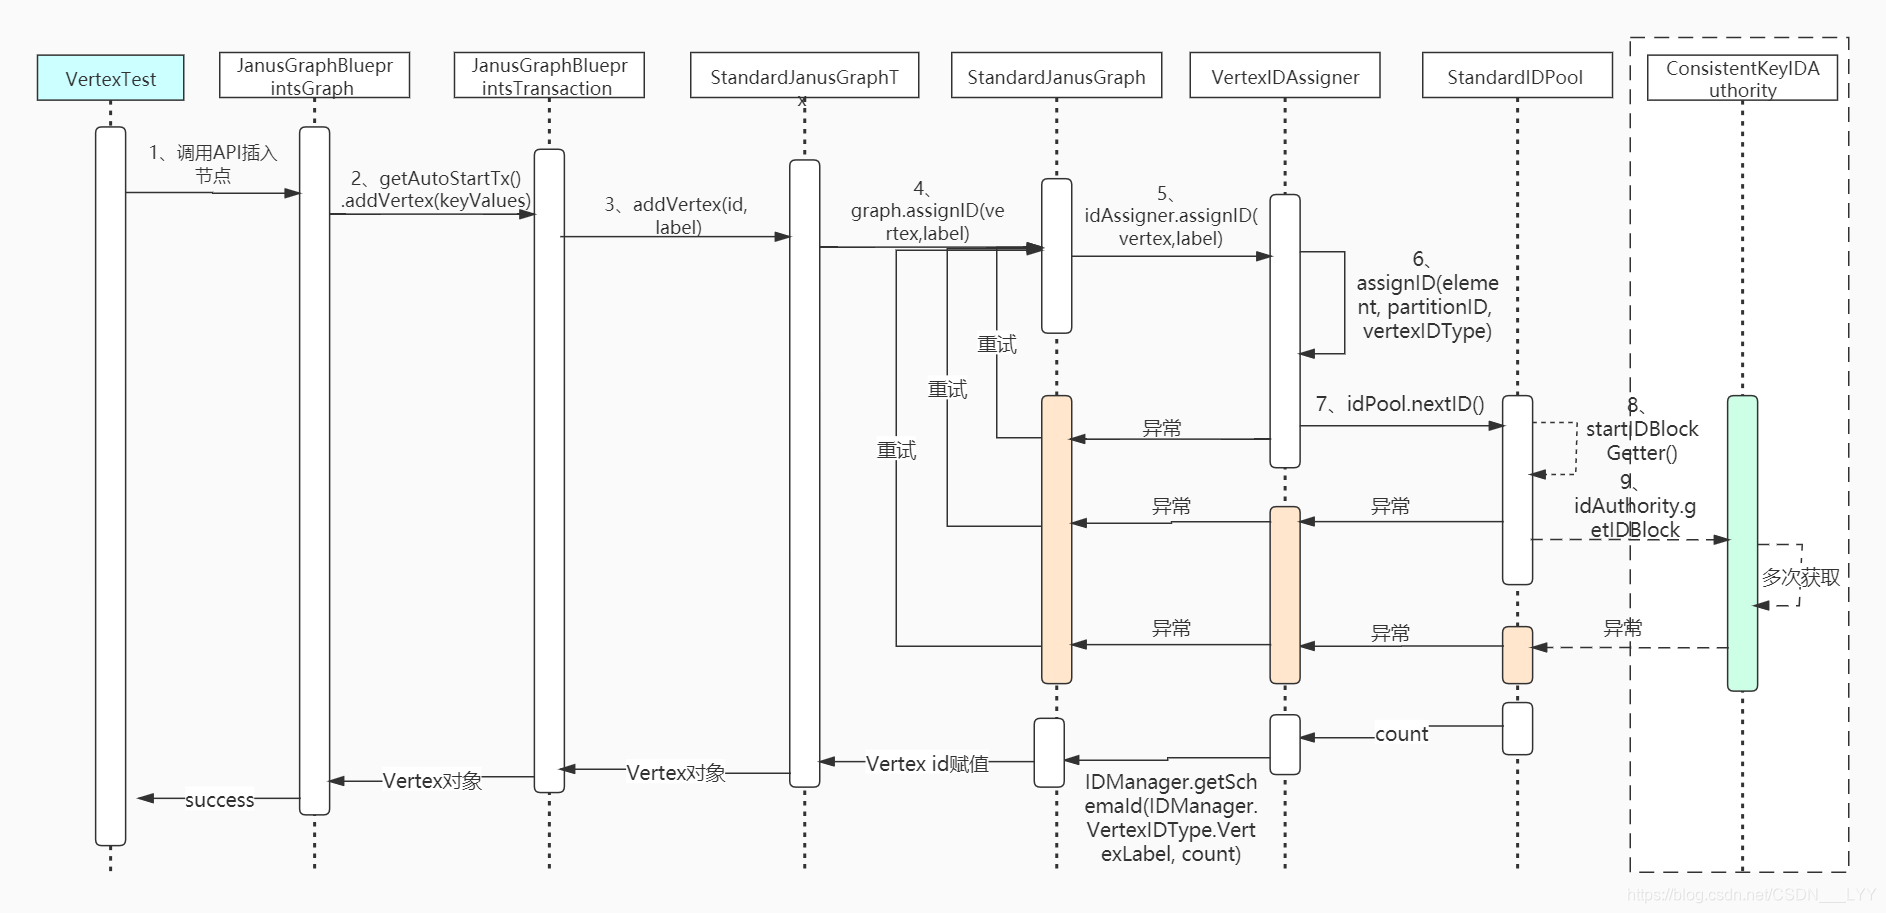
整体的调用流程如下:
四:其他类型的id生成 上述我们主要依据生成节点id(vertex id)的过程来进行分析
在JanusGraph中还包含edge id、property id、schema label id等几种的分布式id生成
所有类型的分布式id的生成主要思想和逻辑都几乎相同,只是一些具体的逻辑可能有所不同,我们理解了vertex id的分布式id生成流程,其他的也可以理解了。
1、property id的生成 在JanusGraph中的property的分布式唯一id的生成,整体逻辑和vertex id的生成逻辑大体相同;
property id的 生成和 vertex id有两点不同:
ID的组成部分: 在vertex id中组成部分包含count+partition+ID Padding; 而在property id中没有ID Padding部分,其组成为count + partition 1 2 3 long id = (count<<partitionBits)+partition;if (type!=null ) id = type.addPadding(id); return id;
partition id的获取方式:在生成vertex id时,partition id是随机获取的;而在生成property id时,partition id是获取的当前节点对应的partition id,如果节点获取不到分区id,则随机生成一个; 1 2 3 4 5 6 7 8 9 10 11 12 13 if (element instanceof InternalRelation) { InternalRelation relation = (InternalRelation)element; if (attempt < relation.getLen()) { InternalVertex incident = relation.getVertex(attempt); Preconditions.checkArgument(incident.hasId()); if (!IDManager.VertexIDType.PartitionedVertex.is(incident.longId()) || relation.isProperty()) { partitionID = getPartitionID(incident); } else { continue ; } } else { partitionID = placementStrategy.getPartition(element); }
2、Edge id的生成 在JanusGraph中的edge的分布式唯一id的生成,整体逻辑和vertex id的生成逻辑大体相同;
edge id的 生成和 vertex id有两点不同:
ID的组成部分: 在vertex id中组成部分包含count+partition+ID Padding; 而在edge id中没有ID Padding部分,其组成为count + partition,代码同property id的生成代码 partition id的获取方式:在生成vertex id时,partition id是随机获取的;而在生成edge id时,partition id是获取的当前source vertex 或者 target vertex对应的partition id,如果节点获取不到分区id,则随机生成一个,代码同property id的生成代码; 3、Schema相关id的生成 在JanusGraph中的schema相关id的分布式唯一id的生成,整体逻辑和vertex id的生成逻辑大体相同;
schema相关id的生成分为四种:PropertyKey、EdgeLabel、VertexLabel、JanusGraphSchemaVertex
ID的组成部分: 在vertex id中组成部分包含count+partition+ID Padding; 在schema对应的id生成,这四种产生的id对应的结构都是一样的:count + 对应类型的固定后缀 1 return (count << offset()) | suffix();
partition id的获取方式:在生成vertex id时,partition id是随机获取的;而在生成schema id时,partition id是默认的partition id = 0; 1 2 3 4 public static final int SCHEMA_PARTITION = 0 ;if (element instanceof JanusGraphSchemaVertex) { partitionID = IDManager.SCHEMA_PARTITION; }
总结 本文总结了JanusGraph的分布式唯一id的生成逻辑,也进行的源码分析;
下一篇,JanusGraph的锁机制分析,包含本地锁和分布式锁相关的分析,我是“洋仔”,我们下期见~